User guide
Upgrade Autopilot User Guide: AI Odoo Module Upgrade & Migration
A practical guide to Upgrade Autopilot: how to install it, create an upgrade run, review AI and rule-based code fixes, verify isolated test results and export upgraded Odoo modules.
KalvyAI Engineering · · 9 min read
Upgrade Autopilot (technical name ki_upgrade_autopilot) is an Odoo app that moves custom Odoo modules to the next version. It scans your code for breaking changes, applies fixes, installs the result in an isolated test environment, runs the unit tests and gives you a diff to review before you accept anything.
This guide covers what the app does, who it is for, how to install and set it up, how to use each main feature, and what it cannot do.
You can buy and install it from the store page: Upgrade Autopilot on the KalvyAI Store.
What Upgrade Autopilot is for
Upgrading custom Odoo modules is slow, repetitive work. Each major version changes parts of the ORM, the view syntax, the OWL frontend framework and controllers. Most of the effort goes into finding those changes in your code and making the same kinds of edits over and over.
Upgrade Autopilot automates that work in four stages:
- Scan your modules against curated migration rule packs to find breaking changes.
- Fix the code with deterministic AST (syntax tree) transformations for known changes, and with your AI provider for the more nuanced ORM, OWL and XML view refactoring.
- Test the upgraded module by installing it in an isolated container of the target Odoo version and running its unit tests.
- Report anything that needs a human decision in a checklist, with side-by-side git diffs of every change.
Supported migration paths
- 16.0 → 17.0
- 17.0 → 18.0
- 18.0 → 19.0
- 19.0 → 20.0
The app itself runs on Odoo 19.0 or 20.0. The migration paths above describe which module versions it can upgrade.
Who it helps
- Developers who maintain custom or third-party Odoo modules and need to port them to a new version.
- ERP admins planning a version upgrade who want an early, concrete view of how much custom code will break.
- Business owners who want to reduce the cost of upgrades and see a clear list of the items that still need their team's decisions.
Safety: what it touches and what it does not
This is the most important point for anyone running a live system:
- Analysis reads module files as source text. It does not execute your production code.
- Fixes are applied to upgraded copies in staging directories, not to your original source.
- Tests run in separate sandboxes using the target Odoo version.
- Your live production database is never modified.
Install the app on a development or staging instance, not on production.
Requirements
- Odoo 19.0 or 20.0, Community or Enterprise, self-hosted (on-premise) or Odoo.sh
- Docker, or a target Odoo Python environment, for automated test runs
ki_ai_base(AI Base) for AI-powered code fixing- Module dependencies: Base and AI Base (
ki_ai_base)
Odoo Online (SaaS) is not supported, because custom modules require Odoo.sh or a self-hosted server.
[CHECK: whether Docker-based test runs are available on Odoo.sh, or whether Odoo.sh users must use the target Odoo CLI runner]
Installation
- Buy and download Upgrade Autopilot from the store page.
- Make sure
ki_ai_baseis available in your addons path, since Upgrade Autopilot depends on it. - Copy
ki_upgrade_autopilotinto the addons path of your development or staging Odoo 19.0 or 20.0 instance. On Odoo.sh, add it to your repository and push to a staging or development branch. - Restart the Odoo service so the new module is detected.
- In Odoo, go to Apps, update the apps list, search for Upgrade Autopilot and click Install.
If you prefer the command line on a self-hosted instance, the standard Odoo install flag works:
./odoo-bin -c /etc/odoo/odoo.conf -d staging_db -i ki_upgrade_autopilotReplace the config path and database name with your own.
Setup
Connect your AI key (optional)
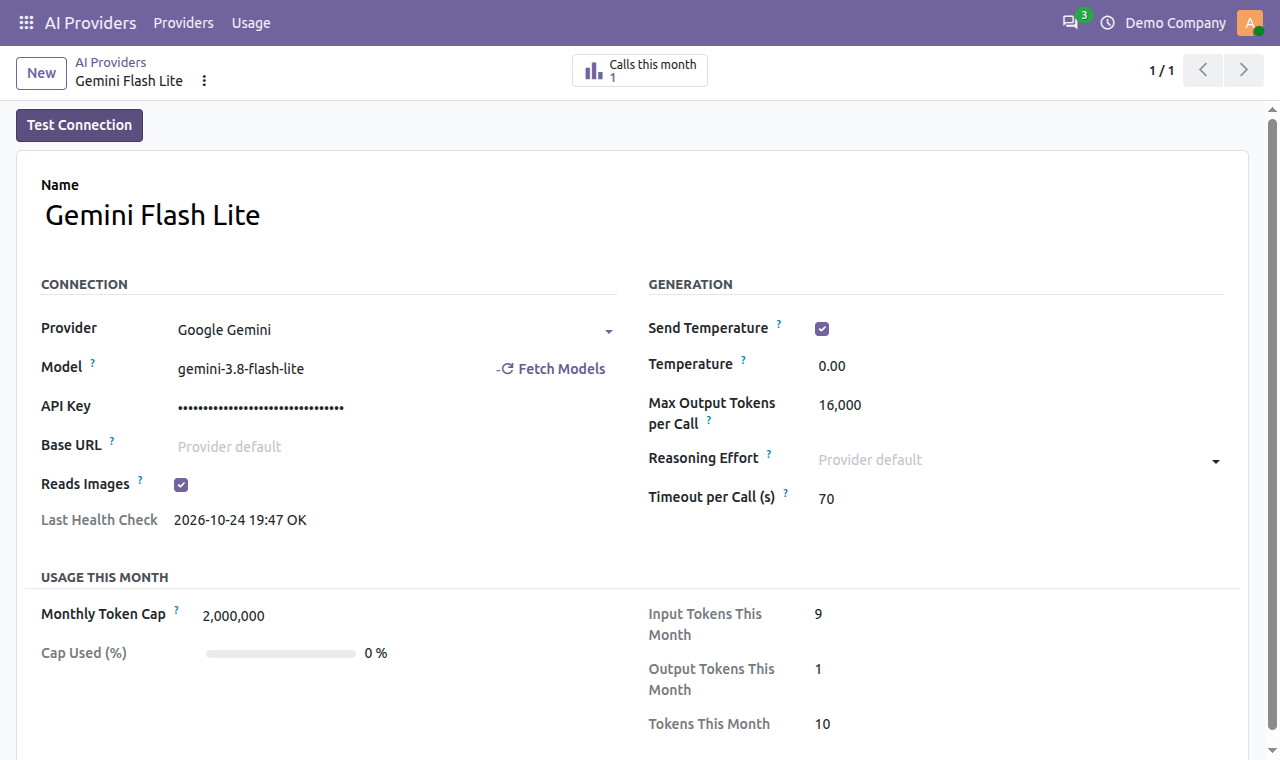
Upgrade Autopilot uses a bring-your-own-key model through ki_ai_base. Supported providers are Google Gemini, OpenAI (GPT-4o), Anthropic Claude and Groq.
- Open the AI provider settings. [CHECK: menu path for AI provider settings in ki_ai_base]
- Select your provider and paste your API key.
- Set a monthly token cap so AI usage stays within your budget.
- Save.
An AI key is not required for basic upgrades. Deterministic rule packs, scan reports and syntax migrations work fully offline. The AI key only enables the AI Fixer for nuanced refactoring.
Prepare the test environment
Automated test runs need either Docker or a Python environment for the target Odoo version.
- Confirm Docker is installed and reachable from the Odoo server, or that a target Odoo version is available to run from the CLI.
- Configure the test runner in the app settings. [CHECK: menu path and field names for test runner configuration]
How to use each main feature
1. Create an upgrade run
An upgrade run is one migration job: a set of modules moving from one version to the next.
- Open Upgrade Autopilot. [CHECK: menu path to Upgrade Runs]
- Click New to create an upgrade run.
- Select the source module directory.
- Set the source and target version, for example 19.0 → 20.0.
- Save the run.
2. Scan for breaking changes (version rule packs)
The rule packs cover ORM, views, OWL and controllers for each supported path. For 19.0 → 20.0 this includes checks for OWL 3, ORM changes and the new view syntax.
- On the upgrade run, start the scan. [CHECK: button label for starting the scan]
- Wait for the scan to finish.
- Review the list of detected breaking changes. Each item points to the affected file and the rule that matched.
The scan only reads files. Nothing is changed at this stage, so it is a safe way to estimate upgrade effort before committing to it.
3. Apply fixes (hybrid deterministic and AI fixer)
Fixes happen in two layers:
- Deterministic fixers apply safe AST transformations for known syntax changes. These are predictable and work without an AI key.
- The AI Fixer sends more nuanced cases (complex ORM logic, OWL frontend components, XML view refactoring) to your configured AI provider.
Steps:
- From the scan results, run the automated fixer. [CHECK: button label for running fixers]
- If you have not configured an AI key, only deterministic fixes are applied.
- When the run completes, the upgraded code is written to a staging directory. Your original source files stay as they were.
4. Review changes in the side-by-side git diff viewer
Every modified line of Python, XML and JavaScript is shown in a side-by-side diff.
- Open the diff view for the run. [CHECK: where the diff viewer is opened from]
- Go through each changed file.
- Pay special attention to AI-generated changes, since those involve judgment rather than fixed rules.
- Accept the changes once you are satisfied.
Treat this like a code review on a pull request. The tool does the typing; a developer should still read the result.
5. Verify with the isolated test runner
The test runner launches a container of the target Odoo version (or uses the target Odoo CLI runner) and checks three things:
- Does the module install?
- Does the schema load?
- What is the unit test pass rate?
Steps:
- Start the test run for the upgrade run. [CHECK: button label for starting tests]
- Open the results when it finishes.
- If installation fails or tests fail, review the error output, adjust the code or the diff, and run again.
Note that the pass rate is only as meaningful as your existing tests. A module with no unit tests will only prove that it installs and loads.
6. Work through the human-action checklist
Some changes cannot be automated safely, such as those that need a business decision, an architectural choice, or depend on an external module. These are collected into a categorized checklist with diagnostic reports.
- Open the human-action checklist for the run. [CHECK: menu path or tab name for the checklist]
- Assign items to the right people on your team.
- Resolve each item, then re-run the scan or tests to confirm.
7. Process multiple modules in bulk
You can point a single upgrade run at an entire custom repository folder or addon suite. All modules in it are scanned, fixed and tested in one run.
- When creating the upgrade run, select the parent folder that contains your modules instead of a single module.
- Run the scan, fixer and tests as above.
- Review results per module. [CHECK: how per-module results are grouped in bulk runs]
8. Export the upgraded module
- Once tests pass and the checklist is cleared, export the modernized module. [CHECK: export options and output format]
- Commit the exported code to your repository on a new branch.
- Deploy it to a staging environment running the target Odoo version and test it with real business flows before going to production.
Tips
- Upgrade one version at a time. Going from 17.0 to 19.0 means running 17.0 → 18.0, then 18.0 → 19.0. Test at each step.
- Run the scan first, on its own. It is read-only and gives you an early estimate of how much work an upgrade will be.
- Start without AI. Run deterministic fixes first, review them, then enable the AI Fixer for what remains. That keeps AI usage, and token spend, focused.
- Set a token cap. Use the monthly cap in your AI settings, especially for bulk runs over large repositories.
- Add tests before upgrading. A few unit tests on critical logic make the test runner's results much more useful.
- Keep your source in git. Diffs and exports are easier to reason about when the original code is versioned.
Limitations
- Odoo Online (SaaS) is not supported. Custom modules require Odoo.sh or a self-hosted server.
- Source code is required. Proprietary binary or encrypted modules without source cannot be refactored.
- Some changes need people. Business decisions, architectural changes and external dependencies are flagged, not fixed.
- Only the listed migration paths are covered: 16.0 → 17.0, 17.0 → 18.0, 18.0 → 19.0 and 19.0 → 20.0.
- Test results depend on your tests. Installation and schema checks are always run; functional confidence comes from the unit tests your modules include.
FAQ
Can it upgrade modules to Odoo 20?
Yes. Rule packs and breaking-change checkers are included for migrating modules from 19.0 to 20.0, covering OWL 3, ORM changes and the new view syntax.
Does it touch or risk my live production database?
No. It reads code statically, applies fixes to isolated working copies and runs tests in separate sandboxes. Install it on a development or staging instance.
Do I need an AI API key for basic upgrades?
No. Deterministic rule packs, scan reports and syntax migrations work completely offline without an AI key.
Which AI models can the AI Fixer use?
Google Gemini, OpenAI GPT-4o, Anthropic Claude and Groq, connected through ki_ai_base with your own API key.
Which Odoo editions and hosting are supported?
Community and Enterprise, on Odoo.sh or on-premise. The app runs on Odoo 19.0 and 20.0.
Can it upgrade third-party modules?
Yes, as long as you have the source code. Encrypted or binary-only modules cannot be refactored.
How much does it cost?
See the store page for current pricing. [CHECK: pricing and licensing details]
How KalvyAI can help
Upgrade Autopilot handles the repetitive part of a migration. The rest, such as the human-action checklist, business process changes, data migration and go-live planning, still needs people who know Odoo well.
KalvyAI is a team of 8 developers with 5+ years of experience building and connecting Odoo, ERPNext and Shopify systems. We can run the upgrade with you, work through the flagged items, review AI-generated changes, and plan a safe rollout to production. We also build AI agents that work inside your ERP with human approvals, budgets and an audit trail.
If you are planning an Odoo upgrade, contact us to talk through your modules and timeline.
- User guide
- Odoo
- Odoo Migration
- Module Upgrade
- Odoo 20
- AI Agents
- Upgrade Autopilot
KalvyAI Engineering · Engineering team
The engineers who build, connect and fix business systems at KalvyAI: Odoo, ERPNext, Shopify and AI agents that work inside them with approvals, budgets and an audit trail.
Comments
No comments yet. Questions and corrections are welcome.
Rate this post or leave a comment